|
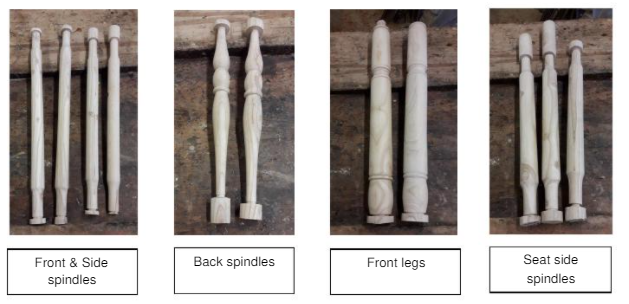
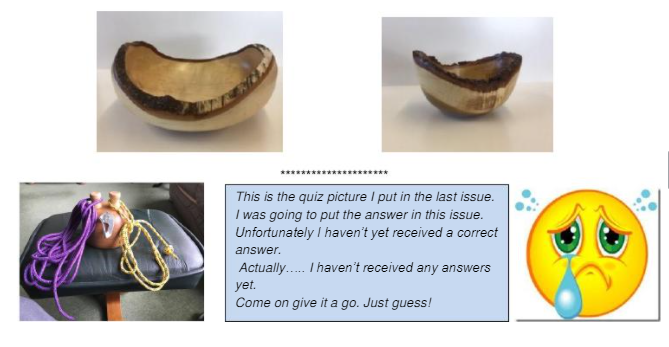
Can’t believe another 3 weeks have gone by and it’s time for another round up of turning tales. A new feature in this issue:- “Me & My Shed” Starting off with Tom Dullage. (I was going to call this “Turners In Their Sheds” but …………….). Having said “all contributions gratefully received” Tom took me at my word and sent this (edited) article which has inspired the feature. “My smallish, single car, garage, has never, in the 35 years we've lived here, housed a car. Having parted with our last motorcycle a few years ago, it has since become my woodworking shop, initially with very few tools. Many years ago, I made some simple wooden toys for my children, mostly inspired by Richard Blizzard’s books from the 1980s. When our grandson, Aaron, came along, I thought I would try my hand at replicating some of those toys for him and, a few years later, for granddaughter Emma. I gradually acquired a few power tools and found a web site, Toymakingplans.com, where I could buy and download lots of excellent wooden toy plans, reasonably cheap and well designed. So I started making quite a few cars and trucks, for the grandchildren and children of friends and relatives. For many years I'd quite fancied having a go at wood turning, but never had room, or budget, for a lathe and the associated tools, but, with a bit of re-organisation and with a bit more spare cash, I finally decided to take the plunge, so I had a chat with the folk at Axminster tools and ordered an Axminster AC305WL, which arrived in mid September 2019. I very nearly bought the basic model, but decided, luckily, that the variable speed model might be a better bet, good decision! Enough of the preamble, this is supposed to be about the workshop! So, I was working in a cold and slightly damp attached garage. I had made an attempt to insulate the outer wall, a few years ago, with some pearlboard (insulation-backed plaster board) dot and dabbed to the inside of the wall, but it really hadn't made much difference, as most of the heat was being lost through the draughty steel garage doors and concrete slab roof, so something better was needed. Just before all this C-19 crisis hit, I ordered some sheets of 18mm OSB and Kingspan insulation sheets and set to work. First job was to build a stud wall inside the steel doors, for both insulation and draught proofing, OSB on a stud frame, with 50mm Kingspan between and a small man door to maintain access from the front of the garage. Next, some more studs fixed to the outer wall, over the existing pearlboard, 25mm Kingspan, then skin with more 18mm OSB. That has given me two walls to which shelves and fixings can be easily fixed. I also put some studs and a single sheet of 18mm OSB on the inner wall, behind the workbench, just to make fixing things up easy. I've started a French Cleat system there, which I intend to also do on the wall above the lathe. The ceiling was a bit of a puzzle, as it's a solid concrete slab and not fun to fix things to, so I decided to just fix some lengths of stud at each end and lay the 50mm Kingspan sheets on these, to provide some insulation overhead. The next step will be a proper electrical installation. I've got an electrician lined up, but, of course, he can't come until the lockdown is over. The rather odd floor covering is our old lounge carpet, which is easier on my feet than the concrete floor, much warmer and surprisingly easy to sweep and vacuum. I have a small electric fan heater to help warm the place up, but don't need it on much, especially at the moment! Time will tell how successful the insulation has been, as I haven't gone through a winter with the current arrangements, but I'm hopeful of it being warmer and drier. The stud wall at the front of the garage, as well as insulation and draught proofing, has provided a nice extra storage area, as I can now have shelves there. Still a bit of tweaking to do and the next major project is to build a shed, so my bicycle and some of the other odds and ends can be moved out of the garage, giving me a bit more room to organise things better, but, for now, it's a pretty handy place to work. Toy making has taken a back seat, since the arrival of the lathe, but I will get back to it at some point. The lathe has already opened up some extra avenues to explore, to enhance the toys. I hope the accompanying pictures tell the rest of the story, I think there's already more than enough reading here! “ I think the French cleat system is a brilliant idea. Cost effective and very flexible. Thanks Tom Part 2 of Pete Osborn’s chairs. If you recall, Pete is in the process of making a new set of dining chairs. We saw the steam bent back slats in Letter 1. Here are the remaining turned components. We’ve been promised the finished article for the next issue Our Chairman Roger has been getting creative making a table for use outside. Apparently it’s so he doesn’t have to bend so far to get his glass of wine. Here’s what he sent. “First photo shows the pieces I intended for the outdoor project. A waste of time as the wood was far too wet, fancied myself as a bodger! I should have known better……... The second attempt, after finding some dry wood. The top, 3 pieces of scrap wood (left over from bird boxes), main spindle from a piece of bannister or handrail in oak, next bit, brown wood, (no name) larger diameter to accept tripod legs, 3 in oak, random bits all finished 4 coats of finishing oil, and, hey ho, one very cheap and cheerful outdoor table My daughter saw a picture of it, “Well I don’t think it will make the Antiques Road Show” was her gentle comment !!! The other project was “ Table Lights” after the style of Ian’s lights, taller and with a twist, I like the one with the thick end of twist at the top ,made in firewood, the other is in yew but with a straight not tapered twist, finished a la Ian’s method,1 coat finishing oil, then buffed with 3 mops and Carnuba.” The end photo is Roger’s first selfie. Are you sure that’s tea in the mug Roger? You did say it was a wine table. Having seen Pete’s natural edged bowls (letter 3) I remembered I had a couple of rough turned bowls lurking in the “too difficult” pile. I was inspired to resurrect them and see if I could somehow re-chuck them and finish them off without them flying off the lathe. It worked ok by keeping the speed down and the results can be seen below. The one on the left is silver birch and about 11” in diameter. The one on the right is in cherry and about 7” in diameter. I managed to keep the bark on both and, surprisingly, the skin on my knuckles. Both are finished with OSMO Polyx Oil. Very slow drying in turning terms but it produces a nice satin finish 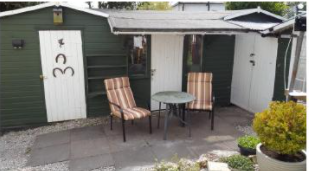 This is the second of our features on “Me and My Shed”. This one is from Terry Hutton. It should really be called “A Tale of Two Sheds”. Read on to find out why:- Building my Own Workshop - Terence Hutton “It has been twelve years since we moved into our ‘new’ house in Grange-over-Sands. We chose the house for many reasons, but largely because of the wonderful views overlooking Morecambe Bay. We love the house, the town and its position. However, the only thing missing was a good sized working space for any DIY or general pottering. So, after much thinking, I decided the best thing to do would be to acquire a workshop, 24 ft by 8 ft would be perfect. But, as you know, buying a workshop that size would be very expensive. I shopped around, getting several outlandish quotes, but was pleasantly surprised with the response from one particular supplier, Haverigg Prison. It was clear that they made a quality product, but it was only available in a certain size i.e. 8 ft.x 8 ft. and they could not guarantee delivery date. Completion of products, as I learned, depended on the number of inmates who were trusted with handsaws, chisel hammer etc. To get round the size problem, I decided to actually buy two sheds, planning to stand them apart and build a roof and walls between them. So, I put in an order for 2 x 8 x 2 sheds, with floor and PENT roof included. Finally, 6 months later the sheds finally arrived. But unfortunately, instead of being PENT roofs, they had APEX roofs, as you can see below. This meant I had to alter my plans slightly but as you can see the final result came out well. The combined sheds are now one complete workshop, which sit on a made to measure wooden foundation. The foundation sits on concrete slabs laid to various heights to account for the slope of the garden. Once the foundations were in and the workshop built I set about running the electricity and wi-fi to the shop. I installed a full ring main circuit with 12 socket outlets, after giving a lot of time to creating the electrical plan. However, it turned out I still needed several more outlets and the first of what would be several extension cables was added. Getting the internet was a much a much simpler task. I now have a friendly lady called Alexa who I can talk to whenever I want. I have now completed all the insulation of the workshop to BS 75000! The whole workshop is warm. I use a small heater to keep the temperature at a steady 18 deg. Overall I am very pleased with how it has turned out and enjoy spending many hours 'self-isolating’. Although the sheds took a long time to be delivered and weren’t exactly what I ordered they have worked out well in the end. My next plans are to install better lighting, as well as dust collection and an air line, but that will have to wait another day. As for inside the workshop, I have lots of tools, many of which I have built myself. If any of you think that would be interesting I will write a little about those as well. If anyone has any questions about using sheds to create a workshop, let me know. Or if you want to share a similar story or photo of your own workspace, feel free to share.” Yes please Terry we would love to see the inside of the shed. Does Alice know about this Alexa lady you have stashed in there? Another new feature (I do spoil you). I thought it would be useful to have a “For Sale and Wanted” section. After all most of us will have sorted out the shed now and found all sorts of interesting things we had forgotten and you may no longer need. Hopefully you have a pile in the corner for Tools with a Mission but you have stuff you want to sell or swap. You will recall I recently sent an email out from Frank Rice with information on a lathe. Now here is one from Gordon McIver.  I have an Electra Beckham band saw free to anyone who can collect it . It is in quite good condition and is a very heavy machine. Anyone interested please contact Gordon McIver on 01539 725265. Many thanks Gordon If there is something you need or want to swap or sell let me have the details and we can publish them here. Remember “A few words and a photo” is all I need. I am in need of more material for future issues. It would be great to see something from those who haven’t contributed yet. I am very grateful from my “regular” contributors but it’s a bit like demonstrating. Don’t want you to be saying “Oh no not him again” All I need is a few words and a photo. So come on you must have made something during lockdown. Doesn’t necessarily have to be turning if you think it could be of interest to your fellow members. Lockdown may be easing but I suspect it may be a while before we can meet as a club. That’s the end of this issue folks. Thank you for reading Don Davies 27th May 2020 Hi All Starting this one off with a contribution from me. I decided to take advantage of the lockdown by having a good clear out of the shed and rearranging of various bits of kit. First on the list was re-routing the dust extractor trunking from the lathe. My lathe sits on a bench with a cupboard under and the bench against a wall. Behind the wall is a small store in which I keep the dust extractor. I had originally had the bright idea (or so I thought) of fitting a plastic hopper head in the bench top under the lathe to catch all the woodchips. It was effective to a point but, as we know, woodchips go everywhere and not where we want them to. I had a separate smaller suction tube for dust linked in but it tended to get in the way. One of the major disadvantages was that the routing of the trunking involved 3 x 90 deg bends. As any engineer will tell you every sharp bend reduces the flow of air, so I was obviously not using the power of the extractor to best effect. Another was that, when collecting chips, especially with green wood, the system was prone to blockages. I had decided to take the extraction directly through the wall so reducing bends to a minimum. The hopper head was removed from the bench top without too much bother and then positioned against the wall to mark the size of the hole I would need. Once this was knocked out and cleaned up I could fit the hopper head through the wall on a light frame. Having got the hopper secured I then had to rework the trunking behind I have also had to fill the hole in the bench top. I will, at some point make a new bench top but not today!. Job done! The suction is much better. The larger shavings still go everywhere but the dust goes where it’s meant to. Down the pipe. You might well ask why such a large extractor for a lathe. It was bought primarily as a chip extractor for the planer thicknesser and saw table. It has twin inlet ports so being able to use such a powerful extractor on the lathe was a bonus. I’m a lucky boy! All I need to do now is improve my turning. Here’s one from Mike Earl. Here is a photo of a platter I turned recently. I believe the wood is Parana pine. It came from a bit of the original staircase in our house. No worries, we have another staircase now! The two parallel lines are veneer that Gordon brought to one of the club meetings. The platter is approximately 22cm diameter. I simply sliced the blank and glued the veneer in before putting it on the lathe . And one from Chris Clements. In between decorating and gardening I have been stick making and woodturning. I have made two sticks, a horn crook and a horn trout, the latter has been published in this month's Stick maker magazine. As for woodturning I have done three boxes and as it was our wedding anniversary I asked Bernie to select one as a gift edit.  ou may recall Pete Osborn showed us some natural edge bowls he had made for a local restaurant, L’Enclume in Cartmel no less. The chef, Tom Barnes, used them for serving his pudding entry in “The Great British Menu” They were spotted by Jon Gibb (didn’t have you down as a foodie Jon!) who told Pete who, with some technical input from his son, watched it on “Catch Up” and downloaded some screen shots which are shown below. Tom won the Northwest heat. The bowls, of course, made all the difference. The food, just some concoction of sponge, pears and honey ice cream, was incidental. One of the judges did make a favourable comment on the bowls! Now I have probably broken all sorts of copyright laws by including the above so please don’t tell anyone. Actually, thinking about it, I can blame Pete as he lifted them off the screen.  It’s a quiz!!. Ian H sent me this photo and asked me if I knew what it was. I got it half right. Can you do better? Let me know. Answer in next letter from lockdown. Have you made something unusual that would provide a brain teaser? Send it along for a future letter. That’s all for this letter. Thank you all for your contributions. I have more tucked away for the next one, or even two. Keep ‘em coming. Doesn’t have to be all turning as you have seen. Hand crafted items are always of interest whatever they are (but no knitting patterns thanks) Don ~~~2nd May 2020 |
CUMBRIA WOODTURNERS ASSOCIATION
Archives
December 2024
Categories |
Site powered by Weebly. Managed by netnerd.com






 RSS Feed